Using an external Java Naming and Directory Interface (JNDI) service to look up Jakarta Messaging administered objects
10 Minute Read
This tutorial shows how to provision and look up Solace Jakarta Messaging administered objects from an external Java Naming and Directory Interface (JNDI) service, hosted outside the Solace message broker.
The Java Naming and Directory Interface (JNDI) to look up Jakarta Messaging administered objects tutorial provided an introduction to JNDI and the use of JNDI services hosted by the message broker. Using the Solace built-in (internal) JNDI server makes integration easy, but some enterprise use-cases already utilize a dedicated JNDI server, and prefer to store Solace Jakarta Messaging administered objects at the same location.
Assumptions
This tutorial assumes the following:
- You are familiar with JNDI basics and the Solace message broker's built-in JNDI service. Refer to the Java JNDI and the Java Naming and Directory Interface (JNDI) to look up Jakarta Messaging administered objects tutorials for more.
- You are familiar with Solace core concepts.
- You have an understanding, or you can refer to the Persistence with Queues tutorial for:
- the Jakarta Messaging basics
- how to send and receive a message using the Jakarta Messaging API
- how to obtain the Solace Jakarta Messaging API
- You have access to Solace messaging with the following configuration details:
- Connectivity information for a Solace Message-VPN configured for guaranteed messaging support
- Enabled client username and password
- Client-profile enabled with guaranteed messaging permissions.
- Admin level rights to configure the Message-VPN
Goals
The goal of this tutorial is to provide guidance and sample code to:
- Populate Solace Jakarta Messaging administered objects into a non-Solace external JNDI store
- Use the external JNDI service for Solace JNDI messaging
Get Solace Messaging
This tutorial requires access Solace messaging and requires that you know several connectivity properties about your Solace messaging. Specifically you need to know the following:
| Resources | Value | Description |
|---|---|---|
| Host | String | This is the address clients use when connecting to the Solace messaging to send and receive messages. (Format: DNS_NAME:Port or IP:Port) |
| Message VPN | String | The Solace message router Message VPN that this client should connect to. |
| Client Username | String | The client username. (See Notes below) |
| Client Password | String | The client password. (See Notes below) |
There are several ways you can get access to Solace Messaging and find these required properties.
Option 1: Use Solace Cloud
-
Follow these instructions to quickly spin up a cloud-based Solace messaging service for your applications.
-
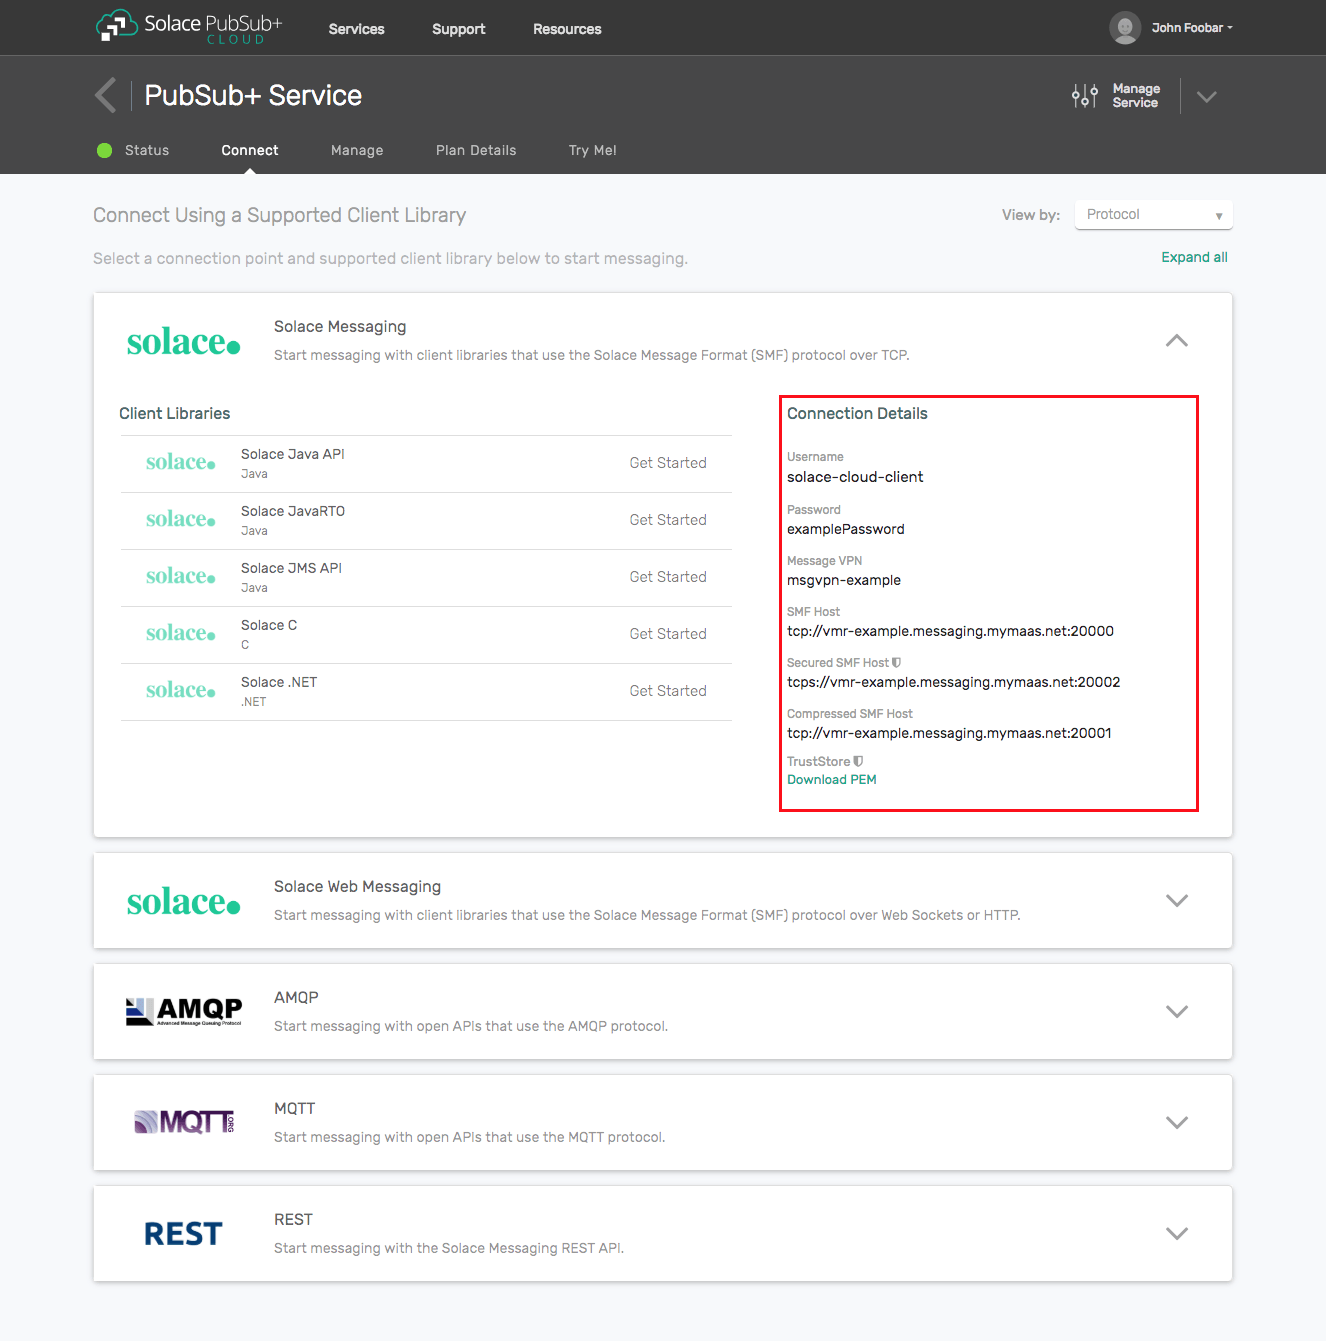
The messaging connectivity information is found in the service details in the connectivity tab (shown below). You will need:
- Host:Port (use the SMF URI)
- Message VPN
- Client Username
- Client Password
Option 2: Start a Solace Event Broker Software
-
Follow these instructions to start the Solace Event Broker Software in leading Clouds, Container Platforms or Hypervisors. The tutorials outline where to download and how to install the Solace Event Broker Software.
-
The messaging connectivity information are the following:
-
Host: <public_ip> (IP address assigned to the VMR in tutorial instructions)
-
Message VPN: default
-
Client Username: sampleUser (can be any value)
-
Client Password: samplePassword (can be any value)
Note: By default, the Solace Event Broker Software "default" message VPN has authentication disabled.
-
Option 3: Get access to a Solace Event Broker Appliance
-
Contact your Solace Event Broker Appliance administrators and obtain the following:
- A Solace Message-VPN where you can produce and consume direct and persistent messages
- The host name or IP address of the Solace appliance hosting your Message-VPN
- A username and password to access the Solace appliance
Obtaining the Solace Messaging API
The latest versions of all Solace APIs can be downloaded from the solace downloads page. Otherwise, check the public samples repository of the API where the library is already packaged as a gzipped tar file. Note: always check for the latest API version!
Overview
This tutorial will use the two Jakarta Messaging administered objects from the Persistence with Queues and Java Naming and Directory Interface (JNDI) to look up Jakarta Messaging administered objects tutorials:
- A
ConnectionFactory– used by Jakarta Messaging clients to connect to the message broker - A Queue
Destination– used for publishing and subscribing to guaranteed messages.
This time they will be created from an external JNDI server lookup, essentially de-serialized from the respective references returned. The sample code will act as a client to the JNDI server.
JNDI has a wide range of server implementations. We will use the simplest: a local file system based JNDI implementation that is so simple that it will not even use authentication. Your JNDI service provider will likely be more complex in that you will need specific configuration, but this example will give an idea of usage, and the kind of data being stored in JNDI for the Solace Jakarta Messaging administered objects. Examples of JNDI providers include LDAP or CORBA Naming Service implementations, the native JNDI service of application servers like IBM WebSphere, JBoss and Oracle WebLogic.
The first sample application will provision Solace Jakarta Messaging administered object data (entries) into the external JNDI server. The sample code will show how to create, read, update, or delete JNDI entries. When creating JNDI entries, we will import existing real JNDI data from the Solace internal JNDI server by using a separate JNDI connection to read from there. This tutorial can be used together with the Java Naming and Directory Interface (JNDI) to look up Jakarta Messaging administered objects tutorial to learn more and experiment with the differences.
Next, another sample will look up the external JNDI data, and use it to connect and send a message to the message broker then read it back.
Importing Jakarta Messaging administered objects from Solace internal JNDI
The following sections describe the code building blocks of the "ExtJndiImport" sample. Section Running the Sample demonstrates how to use it.
Importing involves the following steps:
- Connecting to both the Solace and the external JNDI servers
- Creating a local Jakarta Messaging object from lookup in Solace internal JNDI
- Creating an entry for that object in the external JNDI server
Additional basic administration operations included are:
- Replacing an entry in the external JNDI server
- Listing JNDI contents as a way to verify successful provisioning
- Deleting JNDI entries
Connecting to a JNDI server
JNDI clients need a Java jar library supplied by the service provider to connect and use the JNDI server. The jar client library contains the implementation of javax.naming.spi.InitialContextFactory (note: the JNDI API itself still lives in the javax.naming namespace in Jakarta EE). For example, for the Solace message broker internal JNDI this is included in the Solace Jakarta Messaging API jar file, and the factory class is com.solacesystems.jndi.SolJNDIInitialContextFactory. The jar file for the file system based JNDI implementation used in this tutorial is fscontext.jar, and the factory class is com.sun.jndi.fscontext.RefFSContextFactory.
This is the typical pattern to connect to a JNDI server. Generally, it requires the InitialContextFactory implementation class name (INITIAL_CONTEXT_FACTORY), connection url (PROVIDER_URL), username (SECURITY_PRINCIPAL), and password (SECURITY_CREDENTIALS). In our simple file system based JNDI example the username and password will be ignored.
// JNDI Initial Context Factory
private static final String EXTJNDI_INITIAL_CONTEXT_FACTORY =
  "com.sun.jndi.fscontext.RefFSContextFactory";

// Create the external JNDI Initial Context
Hashtable<String, String> env = new Hashtable<String, String>();
env.put(Context.INITIAL_CONTEXT_FACTORY, EXTJNDI_INITIAL_CONTEXT_FACTORY);
env.put(Context.PROVIDER_URL, extJndiUrl);
env.put(Context.REFERRAL, "throw");
env.put(Context.SECURITY_PRINCIPAL, extJndiUsername);
env.put(Context.SECURITY_CREDENTIALS, extJndiPassword);
extJndiInitialContext = new InitialContext(env);
When importing from Solace internal JNDI to the external JNDI server, the code will use the same pattern to connect to the Solace JNDI:
// Create the Solace JNDI Initial Context
Hashtable<String, Object> solEnv = new Hashtable<String, Object>();
solEnv.put(InitialContext.INITIAL_CONTEXT_FACTORY, "com.solacesystems.jndi.SolJNDIInitialContextFactory");
solEnv.put(InitialContext.PROVIDER_URL, solaceUrl);
solEnv.put(Context.SECURITY_PRINCIPAL, solaceUsername); // Formatted as user@message-vpn
solEnv.put(Context.SECURITY_CREDENTIALS, solacePassword);
solInitialContext = new InitialContext(solEnv);
Creating a local Jakarta Messaging object from lookup of a JNDI entry
A local Jakarta Messaging object will be created when looked up by its JNDI name. Here are examples of looking up ConnectionFactory and Queue type objects from the Solace internal JNDI:
// ConnectionFactory
String cfname = "sol/jndi/test/cf1";
SolConnectionFactory cf = (SolConnectionFactory) solInitialContext.lookup(cfName);
// Queue
String queueName = "sol/jndi/test/q1"
SolQueue queue = (SolQueue) solInitialContext.solInitialContext(queueName);
Creating a new JNDI entry
A local Jakarta Messaging object needs to exist as a starting point, and information that is necessary to recreate it will be entered into the JNDI store. The following example will take above cf and queue Jakarta Messaging objects and insert them into the external JNDI store. There will be an exception thrown if there is already an entry for that name.
// ConnectionFactory
SolConnectionFactory cf = #assuming this object exists and is not null
extCfName = "ext/jndi/test/cf1";
Reference ref = cf.getReference();
extJndiInitialContext.bind(extCfName, ref);
// Queue
SolQueue queue = #assuming this object exists and is not null
extQueueName = "ext/jndi/test/q1";
Reference ref = queue.getReference();
extJndiInitialContext.bind(extCfName, ref);
Replacing a JNDI entry
This works the same way as creating a new entry, but using rebind() will not throw an exception when there is already an entry for the name - it will replace it.
extJndiInitialContext.rebind(name, ref);Listing a JNDI entry or entries under a context
A JNDI name may denote a single object entry ("binding") or a higher level in the naming hierarchy ("context") under which there may be sub-contexts or bindings. The following code will list sub-contexts if the name referred to a context or the object itself if it was a binding:
try {
  NamingEnumeration<NameClassPair> enumer = extJndiInitialContext.list(name);
  System.out.println("Listing of " + name + " {");
  while (enumer.hasMore()) {
    NameClassPair pair = enumer.next();
    System.out.println(pair.getName());
  }
  System.out.println("}\n");
} catch (NotContextException e) {
  System.out.println(name + " found, type: " + (extJndiInitialContext.lookup(name)).getClass());
}
Deleting a JNDI entry
Following will delete an entry or a set of entries under a context in the JNDI store. There will be an exception thrown if nothing exists under that name.
try {
  NamingEnumeration<NameClassPair> enumer = extJndiInitialContext.list(name);
  if (enumer.hasMore()) {
    while (enumer.hasMore()) {
      NameClassPair pair = enumer.next();
      extJndiInitialContext.unbind(pair.getName() + "," + name);
    }
  } else {
    extJndiInitialContext.unbind(name);
  }
} catch (NotContextException e) {
  extJndiInitialContext.unbind(name);
}
Messaging using external JNDI server lookup
The previous section described how the "ExtJndiImport" sample can be used to create JNDI entries for a Solace Jakarta Messaging ConnectionFactory and a Queue in the external JNDI server.
The "ExtJndiTest" sample will look up these JNDI entries to connect to the message broker and send or receive messages.
The code consists of the building blocks from earlier sections of this tutorial and the Java Naming and Directory Interface (JNDI) to look up Jakarta Messaging administered objects tutorial:
- Create the LDAP Initial Context to the external JNDI server
- Lookup the connection factory and queue destination by names and create the Solace Jakarta Messaging ConnectionFactory and Queue objects
- Create a Jakarta Messaging connection to the message broker using the Jakarta Messaging ConnectionFactory
- Create a Jakarta Messaging session, MessageProducer and MessageConsumer
- Send a message using the MessageProducer and wait for the MessageConsumer to receive it
Summarizing
The full source code for this example is available in GitHub. If you combine the example source code shown above results in the following source:
Getting the Source
Clone the GitHub repository containing the Solace samples.
git clone https://github.com/SolaceSamples/solace-samples-jms-jakarta
cd solace-samples-jms-jakarta
Building
Building these examples is simple; you can use Gradle.
./gradlew assembleThis builds all the Jakarta Messaging Getting Started Samples with OS specific launch scripts. The files are staged in the build/staged directory.
Note: the file-based JNDI provider jar "fscontext" is included as a Maven dependency in the Gradle build file build.gradle. Replace this with your JNDI provider jar file's reference. If it is are not available from Maven create a directory "libs" under the project root (same level as the "src" directory) and place the jar file there as the build file has this directory in its source path.
Running the Sample
First, ensure that the Solace internal JNDI has been configured as described in the Java Naming and Directory Interface (JNDI) to look up Jakarta Messaging administered objects tutorial, so we can assume followings exist:
| Solace JNDI ConnectionFactory name | /JNDI/CF/GettingStarted | | Solace JNDI Queue name | /JNDI/Q/tutorial |
Also, see section Get Solace Messaging for Solace hostname, message-vpn (or the one you created), username and password.
Using the "ExtJndiImport" sample, export the JNDI configuration to the external JNDI, passing all the required parameters (examples are provided here, replace them to your values):
- Solace JNDI access details (url, username, password)
- The Solace username takes the form of
username@message-vpn
- The Solace username takes the form of
- External JNDI access details (url, username, password)
- The url for the file-based JNDI must be an existing directory, where a file named
.bindingswill be created if it didn't exist and it can be considered as a simple database. There is no control over the filename. In this tutorial we use the/tmpdirectory, which in Windows may refer to a\tmpfolder under the current drive. - The file-based JNDI example will ignore username and password; the code has been written to require it.
- The url for the file-based JNDI must be an existing directory, where a file named
- Operation: BIND, REBIND, UNBIND or LIST (UNBIND and LIST don't require Solace JNDI access details)
- The Jakarta Messaging administered object reference name in Solace JNDI (-cf for ConnectionFactory, -queue or -topic)
- The Jakarta Messaging administered object reference name to be created in External JNDI (-name)
# Export first the connection factory
$ ./build/staged/bin/extJndiImport -solaceUrl tcps://vmr-mr8v6yiwicdj.messaging.solace.cloud:20258 \
                                   -solaceUsername solace-cloud-client@msgvpn-3e5sq7dbsw9 \
                                   -solacePassword 79p9dhl88mse2e41v9ukqrhb0r \
                                   -jndiUrl file:///tmp/ \
                                   -jndiUsername default \
                                   -jndiPassword password \
                                   -operation BIND \
                                   -cf /JNDI/CF/GettingStarted \
                                   -name ext-cf
# Then export the queue
$ ./build/staged/bin/extJndiImport -solaceUrl tcps://vmr-mr8v6yiwicdj.messaging.solace.cloud:20258 \
                                   -solaceUsername solace-cloud-client@msgvpn-3e5sq7dbsw9 \
                                   -solacePassword 79p9dhl88mse2e41v9ukqrhb0r \
                                   -jndiUrl file:///tmp/ \
                                   -jndiUsername default \
                                   -jndiPassword password \
                                   -operation BIND \
                                   -queue /JNDI/Q/tutorial \
                                   -name ext-q
Observe the contents of the ".bindings" file using a text editor - it contains the imported ConnectionFactory and Queue attributes. The representation is proprietary to the JNDI provider.
Then use the "ExtJndiTest" sample to test messaging with external JNDI lookup. The parameters here all refer to settings and provisioned names in the external JNDI store. The "destination" parameter can be a queue or topic.
$ ./build/staged/bin/extJndiTest -jndiUrl file:///tmp/ \
                                 -jndiUsername default \
                                 -jndiPassword password \
                                 -cf ext-cf \
                                 -destination ext-q
:
*** Sent Message with content: SolJMSJNDITest message
*** Received Message with content: SolJMSJNDITest message
:
You have now successfully imported settings into the external JNDI server, then used it to access the Solace message broker for Jakarta Messaging.